1) Download the latest Nvidia driver for Linux.

2) Install the driver according to the instructions given on the Nvidia web site. You will also have to stop the X-server when installing the driver, a good way would be to install the driver in Recovery Mode.

3) After installation, configure the x-server using:-
Code:
sudo dpkg-reconfigure xserver-xorg


Code:
sudo dpkg-reconfigure -phigh xserver-xorg
, then restart my computer, X starts up perfectly and uses the nv driver. Now if all I do is modify the file /etc/X11/xorg.conf so that the line
Code:
Driver    "nv"
reads
Code:
Driver    "nvidia"


Ok I found some more information that should be useful. There are 3 versions of the nvidia driver on Ubuntu. Each version is in a different package:
  • nvidia-glx-legacy contains version 1.0.7185
  • nvidia-glx contains version 1.0.9639
  • nvidia-glx-new contains version 100.14.19
Each version supports a different set of nVIDIA graphics cards. Go to http://www.nvidia.com/object/IO_32667.html to determine which version supports your graphics card. If you don't know what graphics card you have, go to System > Preferences > Hardware Information, or run the command lspci on the command line.

I have an nVIDIA GeForce FX 5200, which needs nvidia-glx-new, but I had nvidia-glx installed. I'm going to try installing nvidia-glx-new and see whether that gets me any further.


'Development > Linux' 카테고리의 다른 글

sigaction  (0) 2009.08.01
Linux daemon  (0) 2009.07.06
There was an error starting the GNOME Settings Daemon  (0) 2009.03.24
shmctl  (0) 2009.02.20
shmat  (0) 2009.02.20
Posted by 까 치
,
There was an error starting the GNOME Settings Daemon.
Some things, such as themes, sounds, or background settings may not work correctly.
The last error message was:
Did not receive a reply. Possible causes include: the remote application did not send a reply, the message bus security policy blocked the reply, the reply timeout expired, or the network connection was broken.
GNOME will still try to restart the Settings Daemon next time you log in.

덕분에 1시간가량 삽질을 한듯 ...
이유야 여러가지가 있겠지만, 아래와 같이 해결!!

login to a failsafe terminal
$ vi /etc/network/interfaces

Make sure the following lines are in there, and that they arent commented out:

auto lo
iface lo inet loopback

Also, comment out anything involving IPv6 if you dont use it.

then:

$ sudo ifconfig lo up
$ exit

Reboot your box and your good to go. Dont forget to change your session back to Gnome!

참고 : 해당 파일에서 ip setting을 정상적으로 해주면서 해결!!!

Posted by 까 치
,

shmctl

Development/Linux 2009. 2. 20. 16:51

shmctl() 함수는 공유 메모리에 대한 정보를 구하거나 변경 또는 제거합니다. 공유 메모리에 대한 자세한 내용은 shmget() 함수의 내용을 참고하여 주십시오.

헤더

#include <sys/ipc.h>
#include <sys/shm.h>

형태 int shmctl(int shmid, int cmd, struct shmid_ds *buf);
인수
int shmid 공유 메모리 식별 번호
int cmd 제어 명령
struct shmid_ds *buf 공유 메모리 정보 구하기 위한 버퍼 포인터
struct shmid_ds {
  struct    ipc_perm shm_perm;/* 접근권한 */
  int  shm_segsz;            /* 세그먼트의 크기(bytes) */
  time_t    shm_atime;       /* 마지막 접근 시간 */
  time_t    shm_dtime;       /* 마지막 제거 시간 */
  time_t    shm_ctime;       /* 마지막 변경 시간 */
  unsigned short shm_cpid; /* 생성자의 프로세스의 프로세스 id */
  unsigned short shm_lpid; /* 마지막으로 작동한 프로세스의 프로세스 pid */
  short     shm_nattch;     /* 현재 접근한 프로세스의 수 */
  /* 다음은 개별적이다 */
  unsigned short   shm_npages; /* 세그먼트의 크기(pages) */
  unsigned long   *shm_pages;
  struct shm_desc *attaches;    /* 접근을 위한 기술자들 */
  };

shm_perm 멤버의 필드들은 아래와 같이 설정할 수 있습니다.
struct ipc_perm{
       key_t  key;
       ushort uid;   /* owner의 euid 와 egid */
       ushort gid;
       ushort cuid;  /* 생성자의 euid 와 egid */
       ushort cgid;
       ushort mode;  /* 접근 모드의 하위 9 bits */
       ushort seq;   /* 연속 수(sequence number) */
     };
반환
-1 실패
0 성공

예제

예제를 위해 두 개의 프로세스를 만들겠습니다. counter.c 는 공유 메모리에 1초 마다  0부터 계속 증가하는 카운터 문자열을 공유 메모리에 넣으면 show_counter.c에서 공유 메모리를 화면에 출력하도록 하겠습니다.

#include <stdio.h>      // printf()
#include <unistd.h>     // sleep()
#include <sys/ipc.h>
#include <sys/shm.h>
#include <sys/types.h>

#define  KEY_NUM     9527
#define  MEM_SIZE    1024

int main( void)
{
   int    shm_id;
   void  *shm_addr;
   struct shmid_ds   shm_info;

   if ( -1 == ( shm_id = shmget( (key_t)KEY_NUM, MEM_SIZE, IPC_CREAT¦0666)))
   {
      printf( "공유 메모리 생성 실패n");
      return -1;
   }
   else
   {
      printf( "공유 메모리 생성 성공n");
   }

   if ( ( void *)-1 == ( shm_addr = shmat( shm_id, ( void *)0, 0)))
   {
      printf( "공유 메모리 첨부 실패n");
      return -1;
   }
   else
   {
      printf( "공유 메모리 첨부 성공n");
   }

   if ( -1 == shmctl( shm_id, IPC_STAT, &shm_info))
   {
      printf( "공유 메모리 정보 구하기에 실패했습니다.n");
      return -1;
   }

   printf( "공유 메모리를 사용하는 프로세스의 개수 : %dn", shm_info.shm_nattch);

   if ( -1 == shmdt( shm_addr))
   {
      printf( "공유 메모리 분리 실패n");
      return -1;
   }
   else
   {
      printf( "공유 메모리 분리 성공n");
   }

   if ( -1 == shmctl( shm_id, IPC_RMID, 0))
   {
      printf( "공유 메모리 제거 실패n");
      return -1;
   }
   else
   {
      printf( "공유 메모리 제거 성공n");
   }

   return 0;
}
]$ gcc main.c
]$ ./a.out
공유 메모리 생성 성공 공유 메모리 첨부 성공 공유 메모리를 사용하는 프로세스의 개수 : 1 공유 메모리 분리 성공 공유 메모리 제거 성공 ]$
Posted by 까 치
,

shmat

Development/Linux 2009. 2. 20. 16:42

shmat() 함수는 공유 메모리를 마치 프로세스의 몸 안으로 첨부합니다.

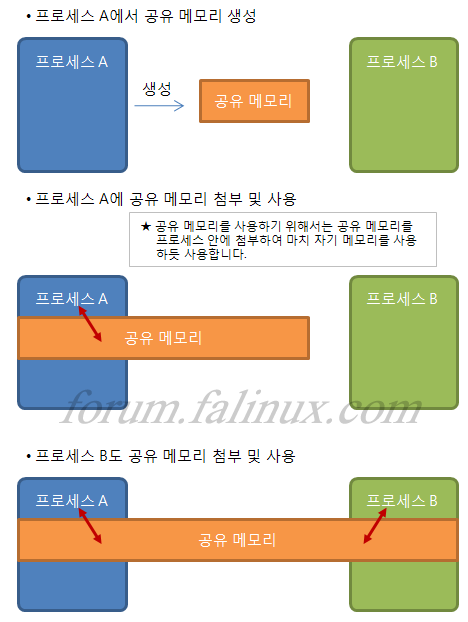
공유 메모리는 단어 뜻에서 알 수 있듯이 하나의 프로세스에서가 아니라 여러 프로세스가 함께 사용하는 메모리를 말합니다. 이 공유 메모리를 이용하면 프로세스끼리 통신을 할 수 있으며, 같은 데이터를 공유할 수 있습니다.

이렇게 같은 메모리 영역을 공유하기 위해서는 공유 메모리를 생성한 후에 프로세스의 자신의 영역에 첨부를 한 후에 마치 자신의 메모리를 사용하듯 사용합니다.

즉, 공유 메모리를 사용하기 위해서는 공유 메모리를 생성한 후에, 이 메모리가 필요한 프로세스는 필요할 때 마다 자신의 프로세스에 첨부를 한 후에 다른 메모리를 사용하듯 사용하면 되겠습니다.
헤더

#include <sys/type.h>
#include <sys/shm.h>

형태 void *shmat(int shmid, const void *shmaddr, int shmflg);
인수
int shmid 공유 메모리를 구별하는 식별 번호
void *shmaddr 첨부되는 어드레스 주소. 일반적으로 NULL을 지정
int shmflg

동작 옵션

shmflg 옵션 내용
SHM_RDONLY 공유 메모리를 읽기 전용으로
SHM_RND shmaddr이 NULL이 아닌 경우일 때만 사용되며, shmaddr을 반올림하여 메모리 페이지 경계에 맞춘다.


반환
(void *) -1 실패
이외 프로세스에 첨부된 프로세스에서의 공유 메모리 주소

예제

예제를 위해 두 개의 프로세스를 만들겠습니다. counter.c 는 공유 메모리에 1초 마다  0부터 계속 증가하는 카운터 문자열을 공유 메모리에 넣으면 show_counter.c에서 공유 메모리를 화면에 출력하도록 하겠습니다.

// counter.c   공유 메모리를 생성하고 공유 메모리에
// 카운터 문자열을 계속 갱신하여 넣습니다.

#include <stdio.h>      // printf()
#include <unistd.h>     // sleep()
#include <sys/ipc.h>
#include <sys/shm.h>

#define  KEY_NUM     9527
#define  MEM_SIZE    1024

int main( void)
{
   int   shm_id;
   void *shm_addr;
   int   count;

   if ( -1 == ( shm_id = shmget( (key_t)KEY_NUM, MEM_SIZE, IPC_CREAT¦0666)))
   {
      printf( "공유 메모리 생성 실패n");
      return -1;
   }

   if ( ( void *)-1 == ( shm_addr = shmat( shm_id, ( void *)0, 0)))
   {
      printf( "공유 메모리 첨부 실패n");
      return -1;
   }

   count = 0;
   while( 1 )
   {
      sprintf( (char *)shm_addr, "%d", count++);       // 공유 메모리에 카운터 출력
      sleep( 1);
   }
   return 0;
}

// show_counter.c   counter.c가 공유 메모리에 넣는
// 카운터 문자열을 화면에 계속 출력합니다.

#include <stdio.h>      // printf()
#include <unistd.h>     // sleep()
#include <sys/ipc.h>
#include <sys/shm.h>
#include <sys/types.h>

#define  KEY_NUM     9527
#define  MEM_SIZE    1024

int main( void)
{
   int   shm_id;
   void *shm_addr;

   if ( -1 == ( shm_id = shmget( (key_t)KEY_NUM, MEM_SIZE, IPC_CREAT¦0666)))
   {
      printf( "공유 메모리 생성 실패n");
      return -1;
   }

   while( 1 )
   {
      if ( ( void *)-1 == ( shm_addr = shmat( shm_id, ( void *)0, 0)))
      {
         printf( "공유 메모리 첨부 실패n");
         return -1;
      }
      else
      {
         printf( "공유 메모리 첨부 성공n");
      }

      printf( "%sn", (char *)shm_addr);

      if ( -1 == shmdt( shm_addr))
      {
         printf( "공유 메모리 분리 실패n");
         return -1;
      }
      else
      {
         printf( "공유 메모리 분리 성공n");
      }

      sleep( 1);
   }
   return 0;
}
]$ gcc counter.c -o counter          
]$ gcc show_counter.c -o show_counter
]$ ./counter &
[1] 8077
]$ ./show_counter
공유 메모리 첨부 성공 2 공유 메모리 분리 성공 공유 메모리 첨부 성공 3 공유 메모리 분리 성공 공유 메모리 첨부 성공 4 공유 메모리 분리 성공 공유 메모리 첨부 성공 5 공유 메모리 분리 성공 공유 메모리 첨부 성공 6 공유 메모리 분리 성공 :

'Development > Linux' 카테고리의 다른 글

There was an error starting the GNOME Settings Daemon  (0) 2009.03.24
shmctl  (0) 2009.02.20
shared memory  (0) 2009.02.20
proxy server 설치하기  (0) 2009.02.17
ALSA  (0) 2008.09.11
Posted by 까 치
,

shared memory

Development/Linux 2009. 2. 20. 16:37

shmget() 함수는 공유 메모리를 생성합니다.

공유 메모리는 단어 뜻에서 알 수 있듯이 하나의 프로세스에서가 아니라 여러 프로세스가 함께 사용하는 메모리를 말합니다. 이 공유 메모리를 이용하면 프로세스끼리 통신을 할 수 있으며, 같은 데이터를 공유할 수 있습니다.

이렇게 같은 메모리 영역을 공유하기 위해서는 공유 메모리를 생성한 후에 프로세스의 자신의 영역에 첨부를 한 후에 마치 자신의 메모리를 사용하듯 사용합니다.

즉, 공유 메모리를 사용하기 위해서는 공유 메모리를 생성한 후에, 이 메모리가 필요한 프로세스는 필요할 때 마다 자신의 프로세스에 첨부를 한 후에 다른 메모리를 사용하듯 사용하면 되겠습니다.

헤더

#include <sys/ipc.h>
#include <sys/shm.h>

형태 int shmget(key_t key, int size, int shmflg);
인수
key_t key 공유 메모리를 구별하는 식별 번호
int size 공유 메모리 크기
int shmflg 동작 옵션
shmflg 옵션 내용
IPC_CREATE key에 해당하는 공유 메모리가 없다면 새로 생성한다. 만약있다면 무시하며 생성을 위해 접근 권한을 지정해 주어야 한다.
IPC_EXCL 공유 메모리가 이미 있다면 실패로 반환하며 공유 메모리에 접근하지 못한다. 이 옵션이 없어야 기존 공유 메모리에 접근할 수 있다.
반환
-1 실패
-1 이외 공유 메모리 생성 성공, 공유 메모리 식별자

예제

예제를 위해 두 개의 프로세스를 만들겠습니다. counter.c 는 공유 메모리에 1초 마다  0부터 계속 증가하는 카운터 문자열을 공유 메모리에 넣으면 show_counter.c에서 공유 메모리를 화면에 출력하도록 하겠습니다.

// counter.c   공유 메모리를 생성하고 공유 메모리에
// 카운터 문자열을 계속 갱신하여 넣습니다.

#include <stdio.h>      // printf()
#include <unistd.h>     // sleep()
#include <sys/ipc.h>
#include <sys/shm.h>

#define  KEY_NUM     9527
#define  MEM_SIZE    1024

int main( void)
{
   int   shm_id;
   void *shm_addr;
   int   count;

   if ( -1 == ( shm_id = shmget( (key_t)KEY_NUM, MEM_SIZE, IPC_CREAT¦0666)))
   {
      printf( "공유 메모리 생성 실패n");
      return -1;
   }

   if ( ( void *)-1 == ( shm_addr = shmat( shm_id, ( void *)0, 0)))
   {
      printf( "공유 메모리 첨부 실패n");
      return -1;
   }

   count = 0;
   while( 1 )
   {
      sprintf( (char *)shm_addr, "%d", count++);       // 공유 메모리에 카운터 출력
      sleep( 1);
   }
   return 0;
}

// show_counter.c   counter.c가 공유 메모리에 넣는
// 카운터 문자열을 화면에 계속 출력합니다.

#include <stdio.h>      // printf()
#include <unistd.h>     // sleep()
#include <sys/ipc.h>
#include <sys/shm.h>

#define  KEY_NUM     9527
#define  MEM_SIZE    1024

int main( void)
{
   int   shm_id;
   void *shm_addr;

   if ( -1 == ( shm_id = shmget( (key_t)KEY_NUM, MEM_SIZE, IPC_CREAT¦0666)))
   {
      printf( "공유 메모리 생성 실패n");
      return -1;
   }

   if ( ( void *)-1 == ( shm_addr = shmat( shm_id, ( void *)0, 0)))
   {
      printf( "공유 메모리 첨부 실패n");
      return -1;
   }

   while( 1 )
   {
      printf( "%sn", (char *)shm_addr);    // 공유 메모리를 화면에 출력
      sleep( 1);
   }
   return 0;
}
]$ gcc counter.c -o counter          
]$ gcc show_counter.c -o show_counter
]$ ./counter &
[1] 8077
]$ ./show_counter

'Development > Linux' 카테고리의 다른 글

shmctl  (0) 2009.02.20
shmat  (0) 2009.02.20
proxy server 설치하기  (0) 2009.02.17
ALSA  (0) 2008.09.11
Proc 파일시스템 이해하기  (0) 2008.09.11
Posted by 까 치
,

'Development > Linux' 카테고리의 다른 글

shmat  (0) 2009.02.20
shared memory  (0) 2009.02.20
ALSA  (0) 2008.09.11
Proc 파일시스템 이해하기  (0) 2008.09.11
ctags &amp; cscope 설정  (0) 2008.05.30
Posted by 까 치
,

ALSA

Development/Linux 2008. 9. 11. 16:12

'Development > Linux' 카테고리의 다른 글

shared memory  (0) 2009.02.20
proxy server 설치하기  (0) 2009.02.17
Proc 파일시스템 이해하기  (0) 2008.09.11
ctags &amp; cscope 설정  (0) 2008.05.30
SVG + CSS Animations = Fisheye Fun  (0) 2008.05.06
Posted by 까 치
,

'Development > Linux' 카테고리의 다른 글

proxy server 설치하기  (0) 2009.02.17
ALSA  (0) 2008.09.11
ctags &amp; cscope 설정  (0) 2008.05.30
SVG + CSS Animations = Fisheye Fun  (0) 2008.05.06
Auto tools tutorial  (0) 2008.04.23
Posted by 까 치
,
- catags 와 cscope 에 대한 설정 방법
ctags -R
set tag = ./tags

example
** mkcscope.sh
rm -rf cscope.files
find . ( -name '*.c' -o -name '*.cpp' -o -name '*.cc' -o -name '*.h' -o -name '*.am' -o -name '*.idl' -o -name '*.xul' -o -name '*.xml' -o -name '*.js' ) -print > cscope.files
cscope -i cscope.files

cf) mkcscope path :: /usr/local/bin


'Development > Linux' 카테고리의 다른 글

ALSA  (0) 2008.09.11
Proc 파일시스템 이해하기  (0) 2008.09.11
SVG + CSS Animations = Fisheye Fun  (0) 2008.05.06
Auto tools tutorial  (0) 2008.04.23
리눅스 압축 명령  (0) 2008.04.01
Posted by 까 치
,

Recently Apple delivered Safari 3.1 with some very exciting features. While we still can’t use things like multiple background images and drop shadows across all browsers, we are getting to play with the future and I, for one, am loving it. One of the most interesting things in Safari 3.1 is the (hopefully soon to be proposed and standardized as part of the CSS3 spec) CSS Animations. CSS animations allow you to animate just about any property on an element as well as do fun things like rotate and skew. As a demo of this I created a quick and dirty CSS3 fisheye/dock demo. As an added bonus, the demo uses SVG in the img tag.

So how does this work? Well here’s the CSS.

For each dock image:

.dock img {
width:50px;
padding:10px;
float:left;
position:relative;
display:block;
-webkit-transition:width 0.5s ease-out, top 0.2s ease-out;
}

With the last line of CSS we set width and top to be transition properties. Next we set the image to grow in width on hover and to bounce upwards when clicked.

.dock img:hover {
width:100px;
}
 
.dock img:active {
top:-40px;
}

With the transition set, Safari handles the rest. Now as a little added fun we set the image following the hovered over image to grow a little as well.

.dock img:hover + img {
width:70px;
}

While this effect isn’t perfect and has little practical use, there is a lot of potential in Safari and CSS3 in general and I look forward to seeing what we as a community come up with.

7 Responses to “SVG + CSS Animations = Fisheye Fun”

'Development > Linux' 카테고리의 다른 글

Proc 파일시스템 이해하기  (0) 2008.09.11
ctags &amp; cscope 설정  (0) 2008.05.30
Auto tools tutorial  (0) 2008.04.23
리눅스 압축 명령  (0) 2008.04.01
cscope &amp; ctag set  (0) 2008.03.28
Posted by 까 치
,